By default, machine learning services allow you to access one computer vision model at a time. Enter Clarifai's Workflow feature: it allows you to use one API request to get results from five different visual models when processing an image.
We'll be demonstrating the use of the Workflow API in the form of a basic web application like the one pictured below. Follow along with us or download the source code on GitHub! Shout out to Selynna Sun for writing the code for the application we'll be featuring.
Create Your Clarifai Application and Workflow
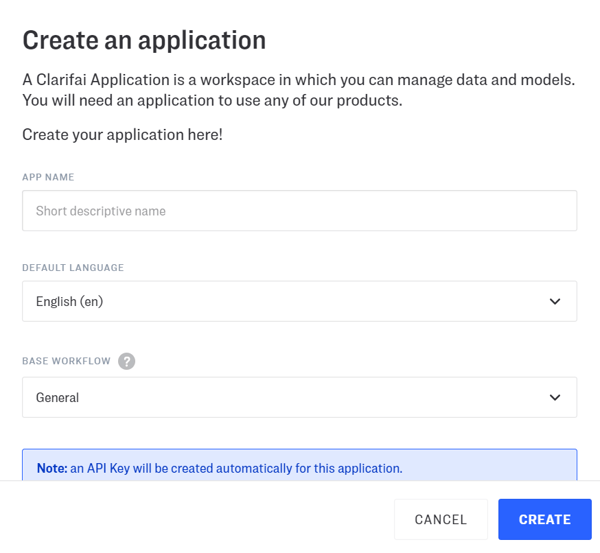
Before we get started, make sure that you have signed up for a free Clarifai account. Once you've done that, you’ll need to create a new application by clicking the Create Application button located in the upper right of the Clarifai Portal user interface.

Once you’ve given your app a name and kept the default options, click create and select your new application. Find the auto-generated API key. This API key allows you to utilize your Clarifai app--we'll be incorporating it into the code a little bit later.
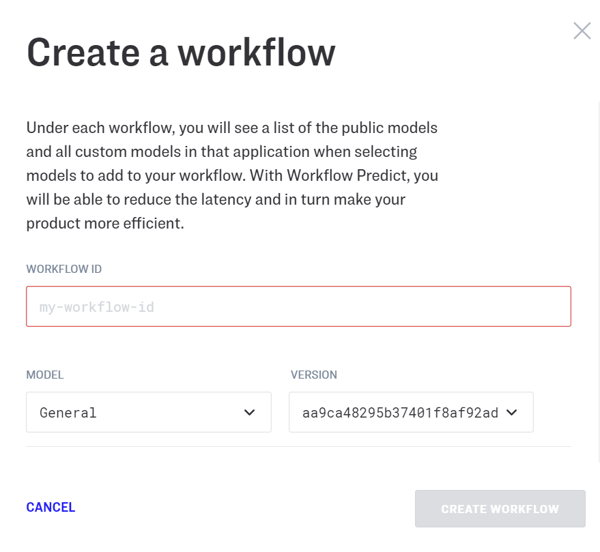
Next, click on the "Create New Workflow" button, under the App Workflows section.

This is where we'll be creating our new workflow, with multiple models! Fill in the workflow ID with something descriptive -- we'll be using this identifier in our code. Under "Model", choose up to five different models you want to analyze a picture with when calling this workflow, and then click "Save Workflow" when you're finished.
You can use your own custom models or use any of Clarifai's public models.
Great! Now everything has been set up, so let's dive into the code.
Prepare Web Application
Make an HTML file called `index.html`. In it, you'll be putting this code:
In the `<head>`, we linked five different things: a CSS file (for styling our page), a font, the Clarifai JavaScript SDK, JQuery (to make some JavaScript functions a bit easier), and our JavaScript file containing all of the processing.
In the `<body>`, we have three different components: a file upload button so we can upload an image from our computer, a placeholder `div` for our image analysis, and a placeholder `div` for the photo.
When you run it, you'll only see the title and a file upload button. Don't be concerned that certain elements are missing! We’ll get the rest there shortly.
But first, we want spice up our page a little bit by adding CSS into `style.css`. This is where the font comes in handy! Here is the CSS we’re using:
https://gist.github.com/selynna/a98e5b07911f34ac4d48a5851a9b784c#file-style-css
The CSS ensures that the image analysis and the photo are side by side, for more convenient viewing. Again, you won't be able to see anything on the page besides the title and the file upload button.
Connect it All With JavaScript
This is where all of the processing and behind-the-scenes work will be happening. Create `index.js` and copy the following code (don't worry, we'll walk through it):
https://gist.github.com/selynna/a98e5b07911f34ac4d48a5851a9b784c#file-index-js
Remember the API key and Workflow ID that we had on the applications page? Copy and paste the API key into this `index.js` file where it says 'YOUR_API_KEY', and the Workflow ID where it says 'YOUR_WORKFLOW_ID'.
There’s a lot in this code, so let’s see what each section does. The app is initialized through the `new Clarifai.App()` function. This allows us to access Clarifai's workflow predict functions.
Uploading an Image in uploadImage()
Before we start sending data to Clarifai, let's set up functionality for uploading an image, so that we can analyze photos that we get locally. In a function called `uploadImage()`, we'll be using `document.querySelector` to get the file uploaded by our `<input type="file">` in the HTML. Then we use JavaScript's FileReader to parse the uploaded image into a base64 string, which then gets placed in the `<img>` element in the HTML. Finally, we can take that same image object and feed it into our `predictFromWorkflow` function, containing the Clarifai processes. If the file goes through, we set the CSS of the image div to `display: inherit`.
Using Clarifai's Workflow Predict API in predictFromWorkflow()
Now, let's move on to `predictFromWorkflow()`. We'll be calling Clarifai's `app.workflow.predict()` to use the workflow we created online. If successful, the response that we receive will give us information about the image analyzed by each of the models you selected. We'll be programmatically parsing through each model analysis to display key information. In this demonstration, we’ll be using the General, Apparel, Demographic, Celebrity, and Food models, all publicly available on Clarifai.
If we `console.log(outputs)` and open up our Food Model, it looks a bit like this:
As you can see, `outputs` contains all information and results from all five models, and we'll be creating individual entries within the `analysis` div in the HTML for each model. We get the model name through `getModelName()`, just to keep our main function neat. It's pulling this information from the output's model's name/display name.
Customizing Output for Different Models in getFormattedString()
We'll be creating a custom formatted string that suits each category. For example, for our general model, we'll want to say something like "The 3 things we are most confident in detecting are…", and for celebrity identification, we'd want to say "The person in this picture we are confident in detecting is…". All of this information is customized, so we will be processing individual cases through the function `getFormattedString()`, where it checks against all public models by way of “if” statements. Some models have different ways of displaying data, and those “if” statements handle each individual case (it's why the function looks daunting!).
By default you’ll get results from each model with the top 20 concepts it detects (e.g. Celebrity model returns 20 potential celebrities, Food model returns 20 potential foods). But in our case, we'll be making information more easily digestible by using only the top three concepts detected. However, this is something that you can change and customize in your code!
Once all that information is gathered, we can append it to the HTML, and it'll end up looking something like this:
Now that we have all the information, we can assume that this image contains an adult man that is probably Gordon Ramsey. He's white and masculine, around 47 years old, and is wearing a watch. The food he is holding is most likely a vegetable (hmm, needs some more training.)
Next Steps with the Workflow API
The Workflow API feature is extremely helpful if you're trying to predict images with multiple models, instead of just one. It makes life easier for the developer compared to calling each model individually. It's also not just limited to public models. You can train your own custom models!


