Welcome to our second AI in 5 post, where we teach you how you can create amazing things in just 5 minutes! If you missed the previous one on training a classifier on top of an LLM, check it out here. In this edition, we'll also be using transfer learning (part of the 5 minute idea!) but also show how you can "deep train" your own models. Deep training is a slower process than transfer learning, so we're mainly including it here for comparison.
You can download the dataset the tutorial is based on here (source: https://www.kaggle.com/datasets/alessiocorrado99/animals10)
We're going to walk through a step-by-step tutorial on how to create and use datasets to train various models, leverage bulk labeling, and use the evaluation module to compare models and choose the one with the highest test performance. Our dataset will consist of images of 5 kinds of animals: horses, dogs, elephants, sheep, and butterflies, and we will be using Clarifai Portal.
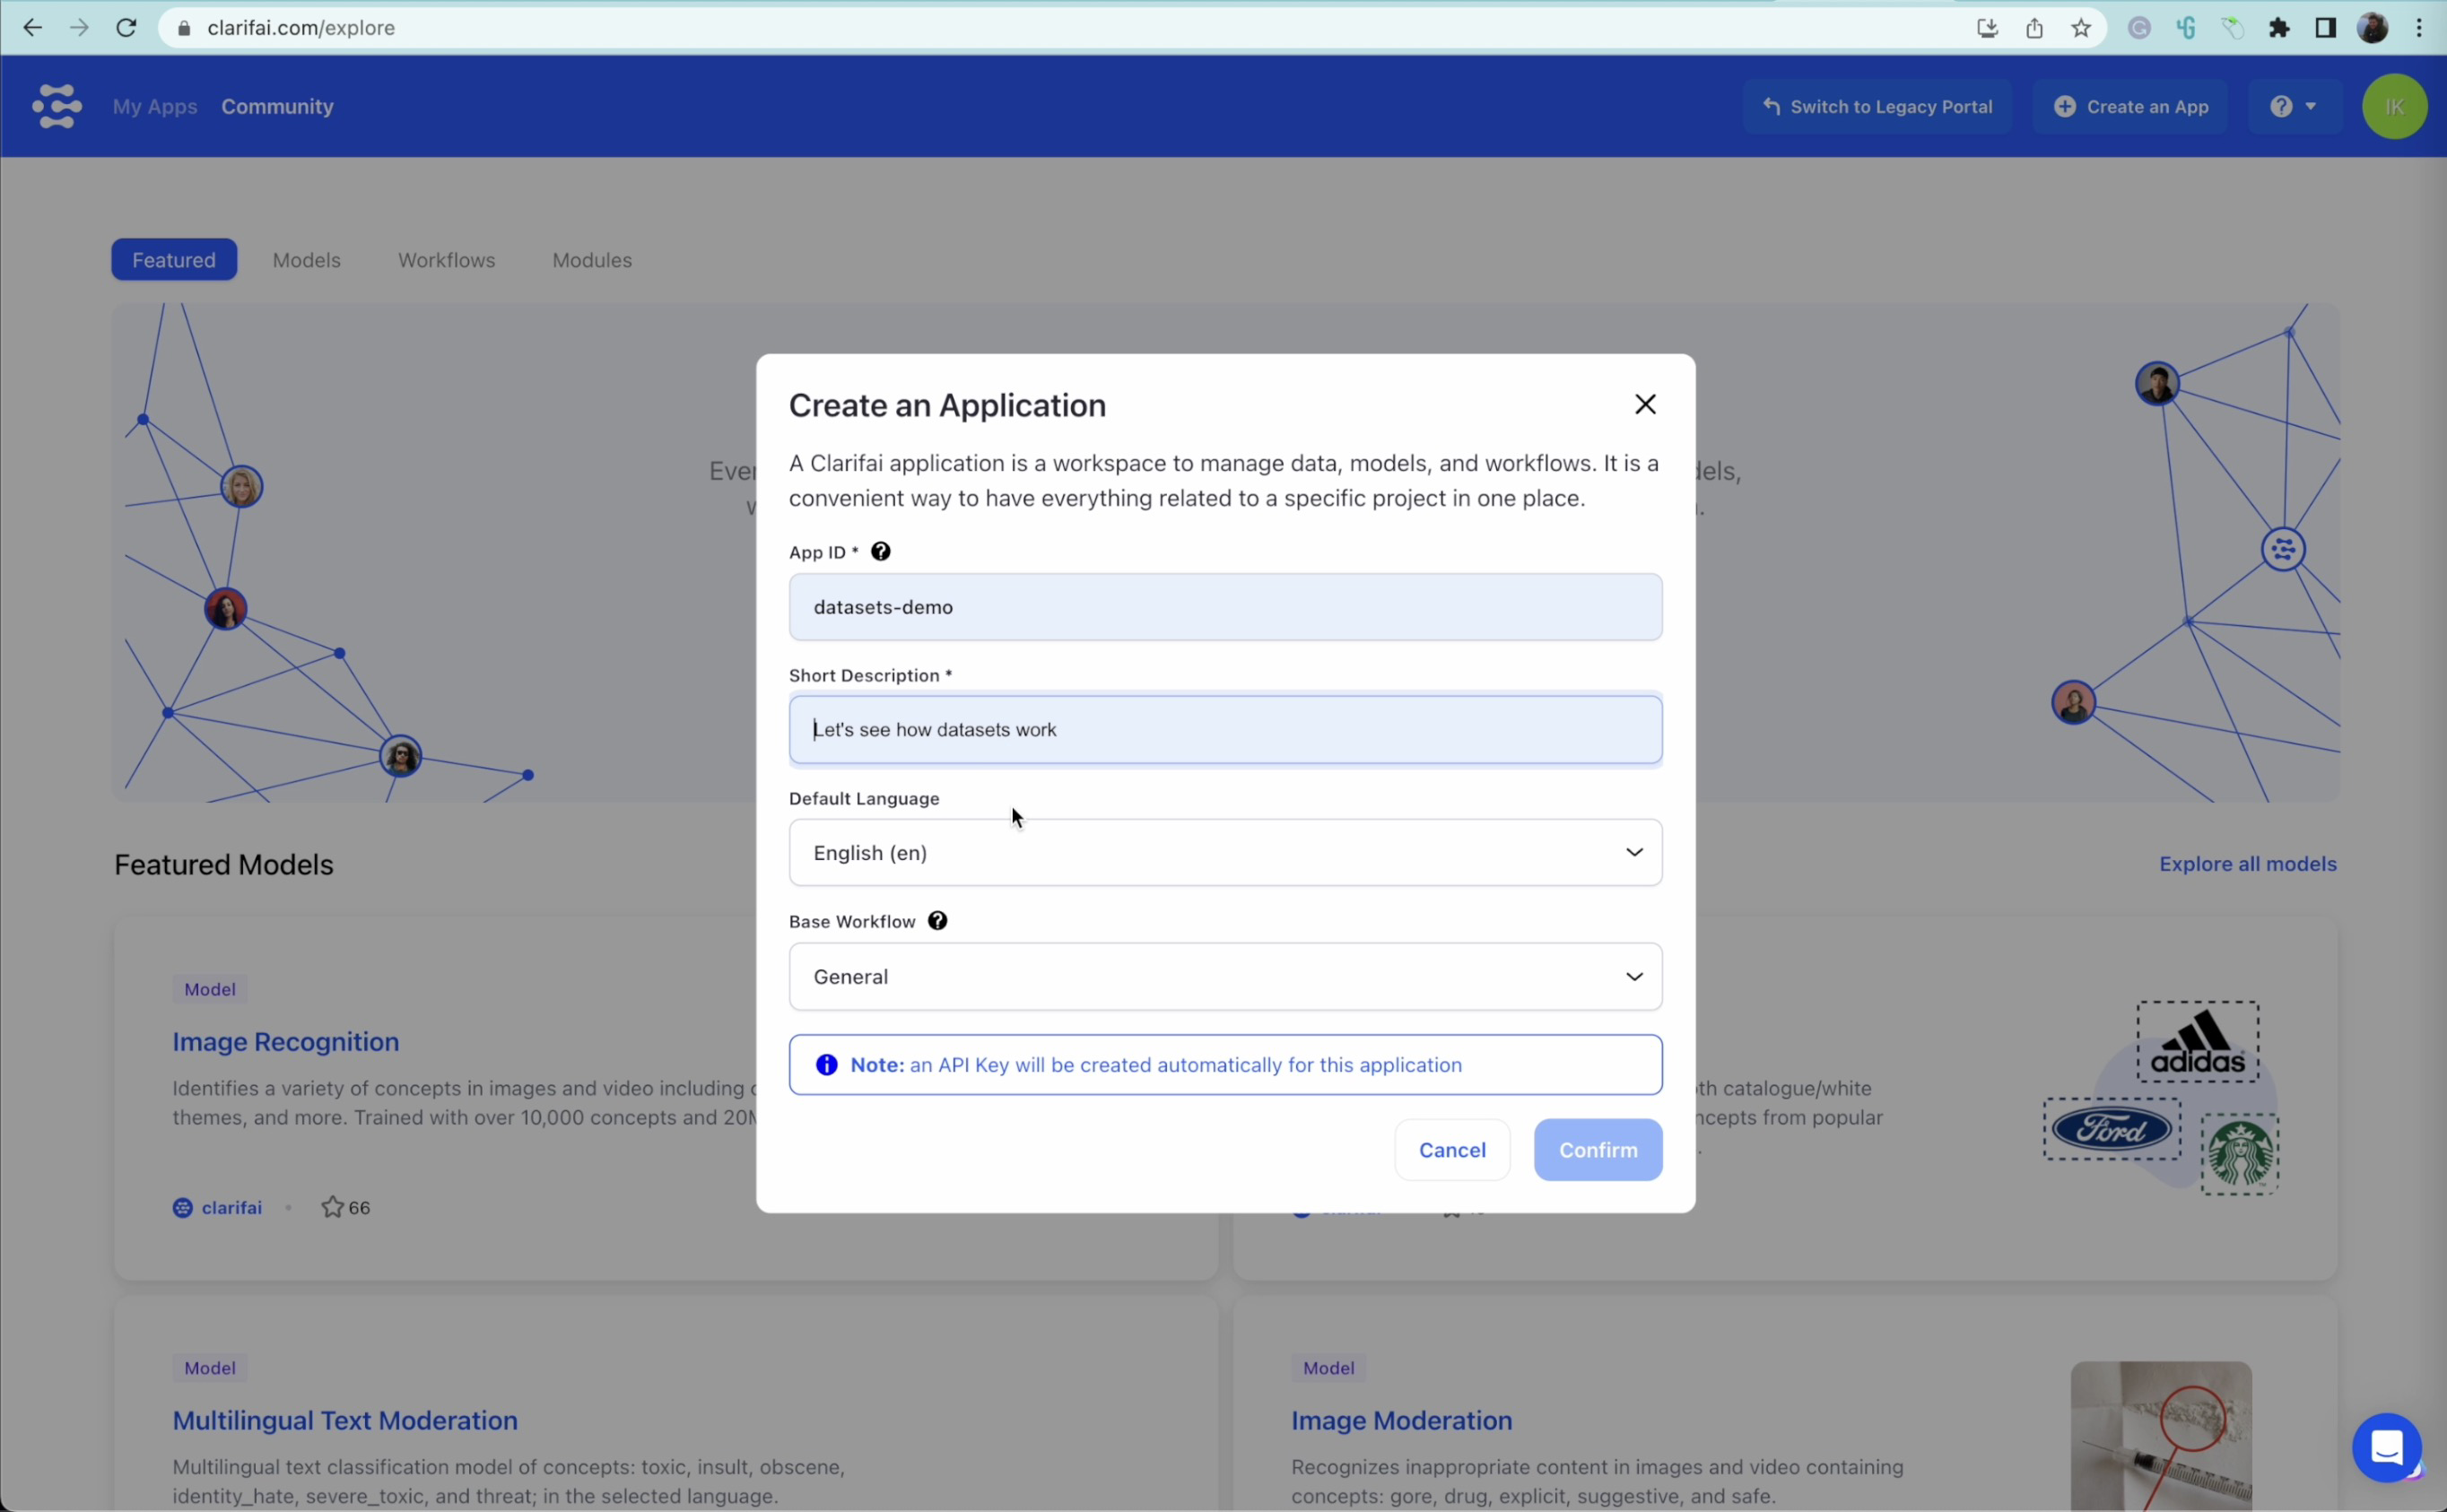
First, we create a new application called "Datasets Demo," giving a brief description and navigating to the application's interface. We can see that we're starting from scratch, as it's empty.
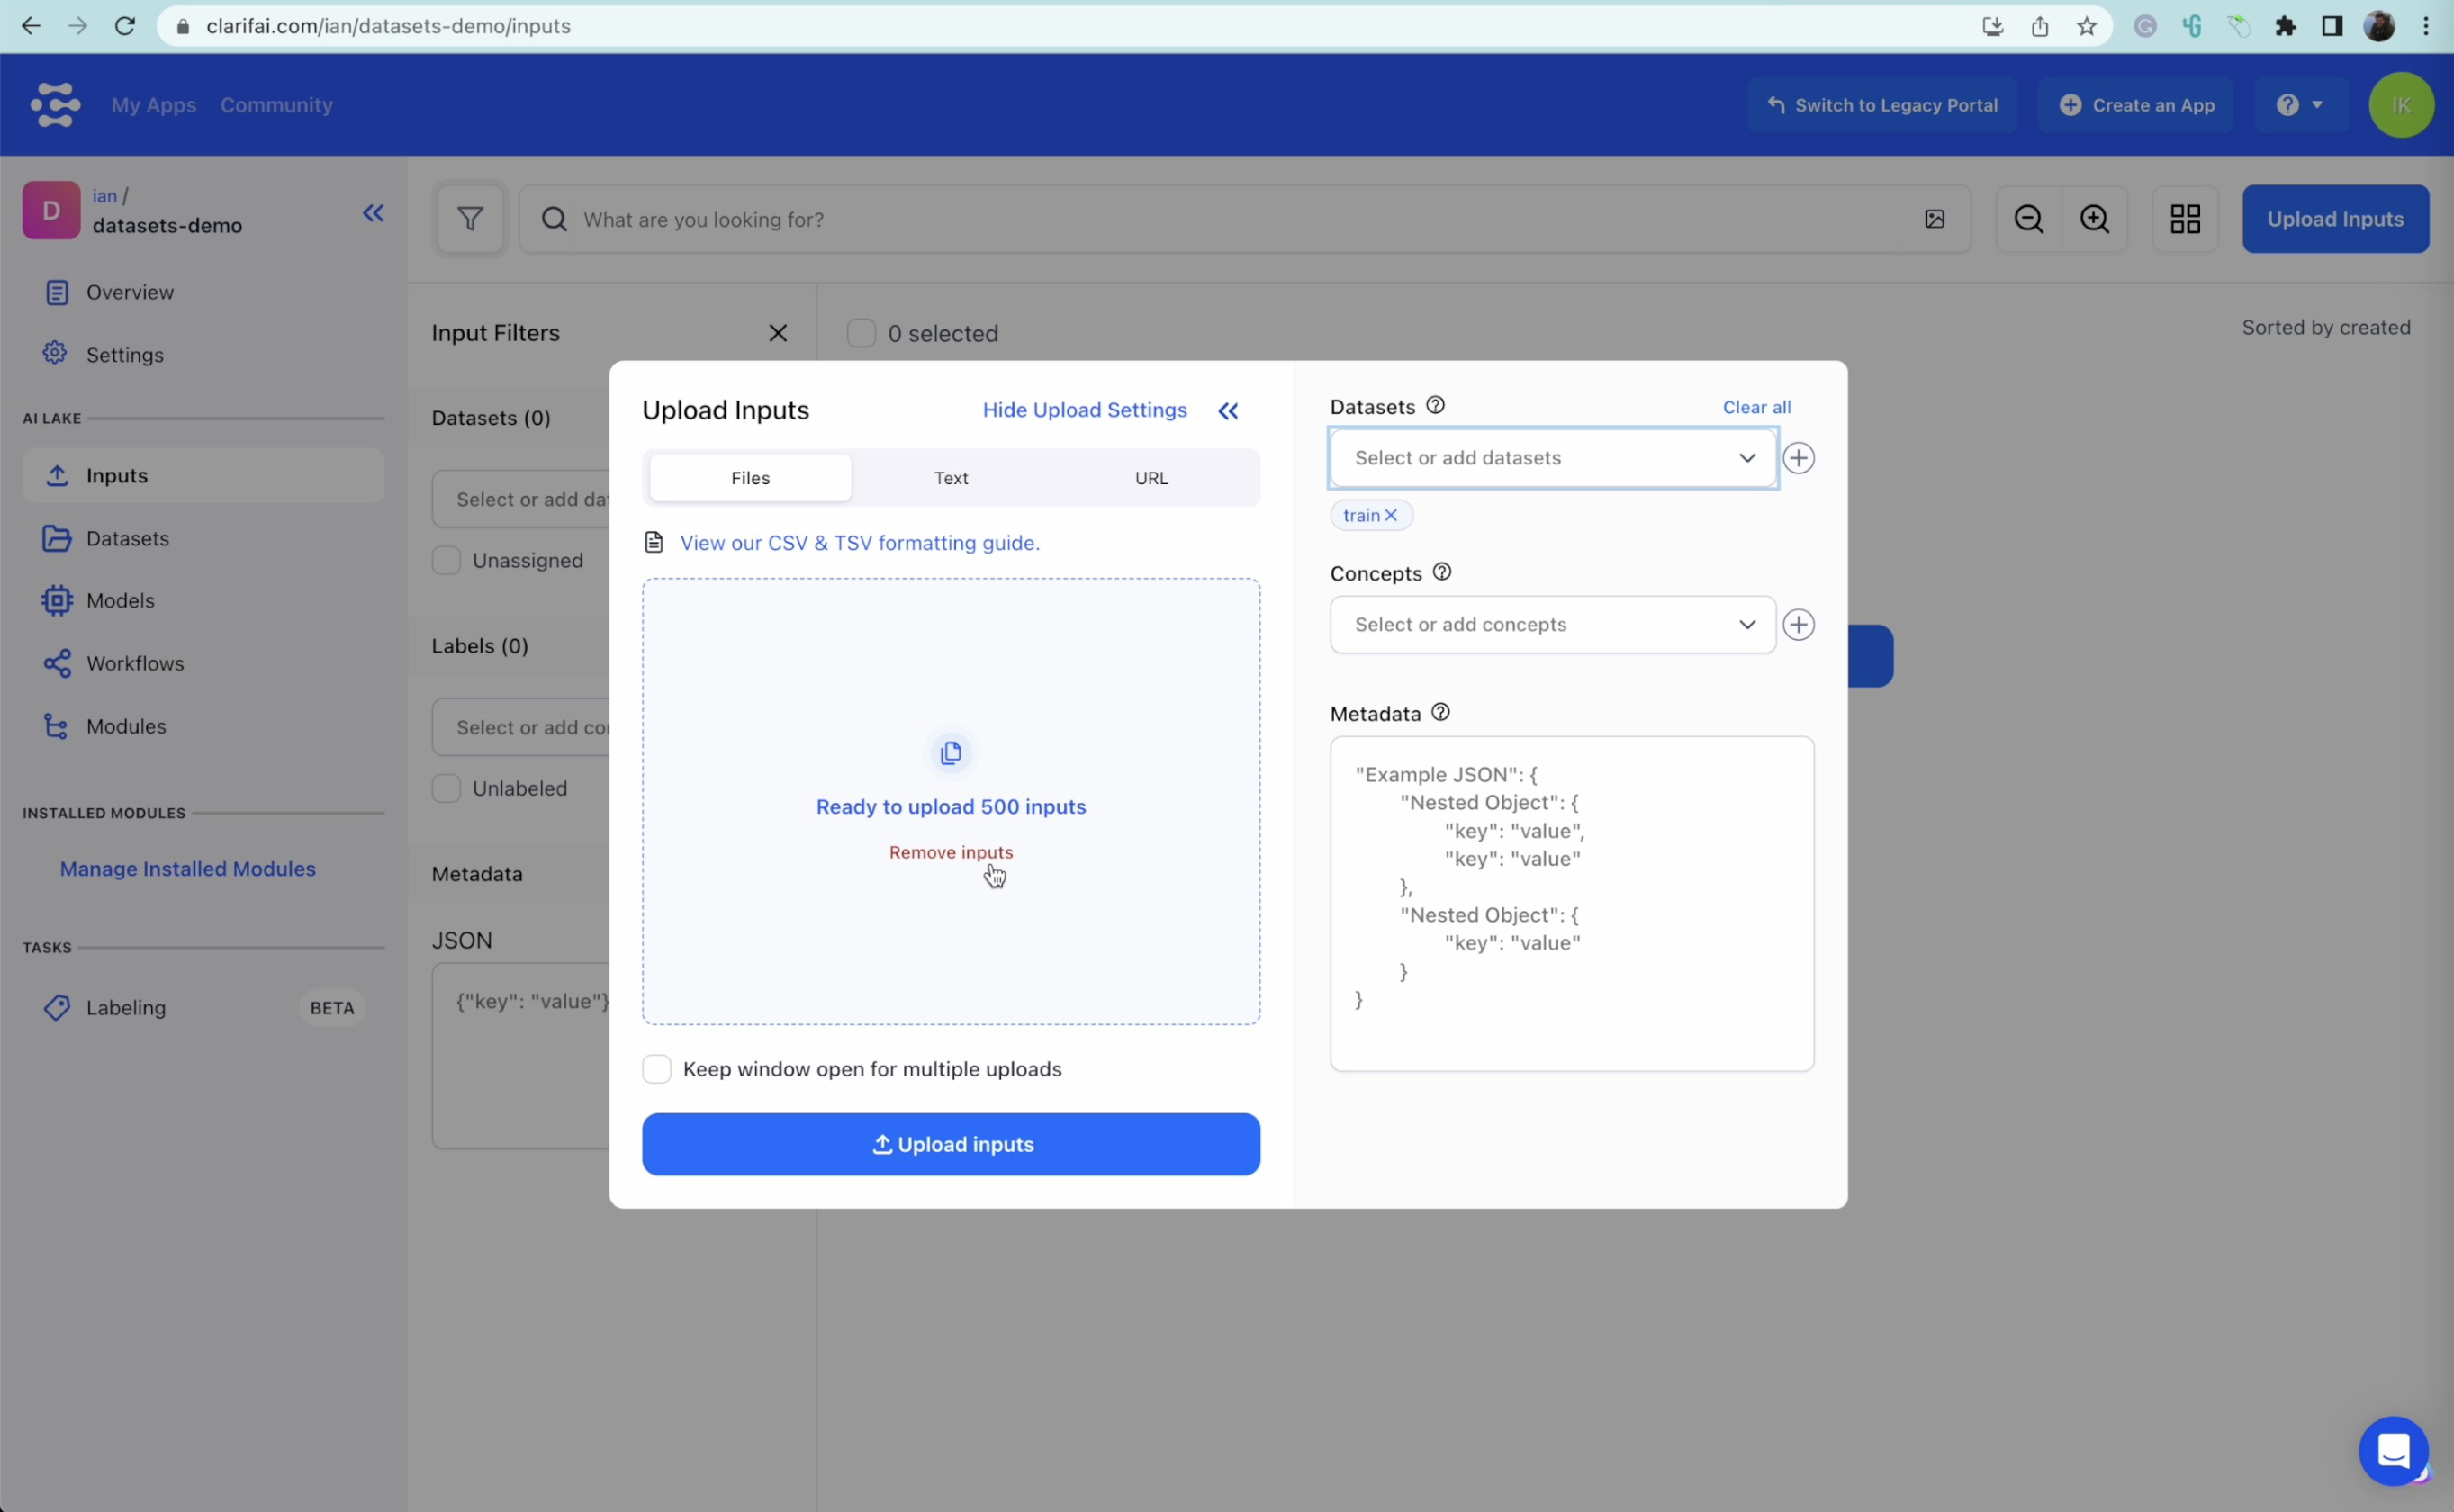
We will upload 700 pictures of different animals - 500 for the training dataset, 100 for the validation dataset, and 100 for the test dataset. Uploading images can take some time, but once done, make sure to check that all the images have been uploaded successfully.
When working with machine learning, it is common to divide your dataset into three parts: training, validation, and test datasets. Each dataset serves a distinct purpose, and using these three datasets helps prevent overfitting and gives you a better understanding of your model's performance.
The training dataset makes up the most significant portion of the data and is used to train your model. It is fed into the machine learning algorithm, allowing the model to learn patterns, features, and relationships within the data. During this learning process, the model adjusts its internal parameters to minimize the prediction error or loss.
The validation dataset is utilized during the model selection and hyperparameter tuning process. This dataset is not used for learning, but to evaluate different variations of the model (different hyperparameters, architectures, or training techniques) and help choose the best one. By comparing the performance of models on the validation dataset, you avoid overfitting the model to the training data, ensuring a better generalization to unseen data.
It is important to note that the validation dataset should be an unbiased sample that remains separate from the training data. Continuously fine-tuning a model based on the validation dataset can cause the model to overfit the validation set, which reduces its generalizability to new data.
The test dataset is kept separate and is used to provide an unbiased assessment of the chosen model's performance, simulating its real-world performance on new, unseen data. This dataset should only be used once you have finalized your model, its hyperparameters, and training approach. Evaluating the model on the test dataset offers an estimate of how well the model will truly generalize when deployed in a real-world application.
Dividing your data into training, validation, and test datasets helps you build, fine-tune, and select the most appropriate model for your problem without causing overfitting or underfitting. The training dataset is used to learn, the validation dataset is leveraged for comparing different models to avoid overfitting, and the test dataset provides a final, unbiased estimate of the model's performance.
With the cross-modal function available on Clarifai Portal, we can type in a specific term and automatically select pictures of the subject we are looking for. In this case, it will be animals such as horses, dogs, sheep, butterflies, and elephants. Carefully scroll through the images and unselect any images that do not belong to the category you are searching. Once the images are selected and sorted, label them accordingly. Be sure to double-check the bottom images listed because they are usually the least probable matches.
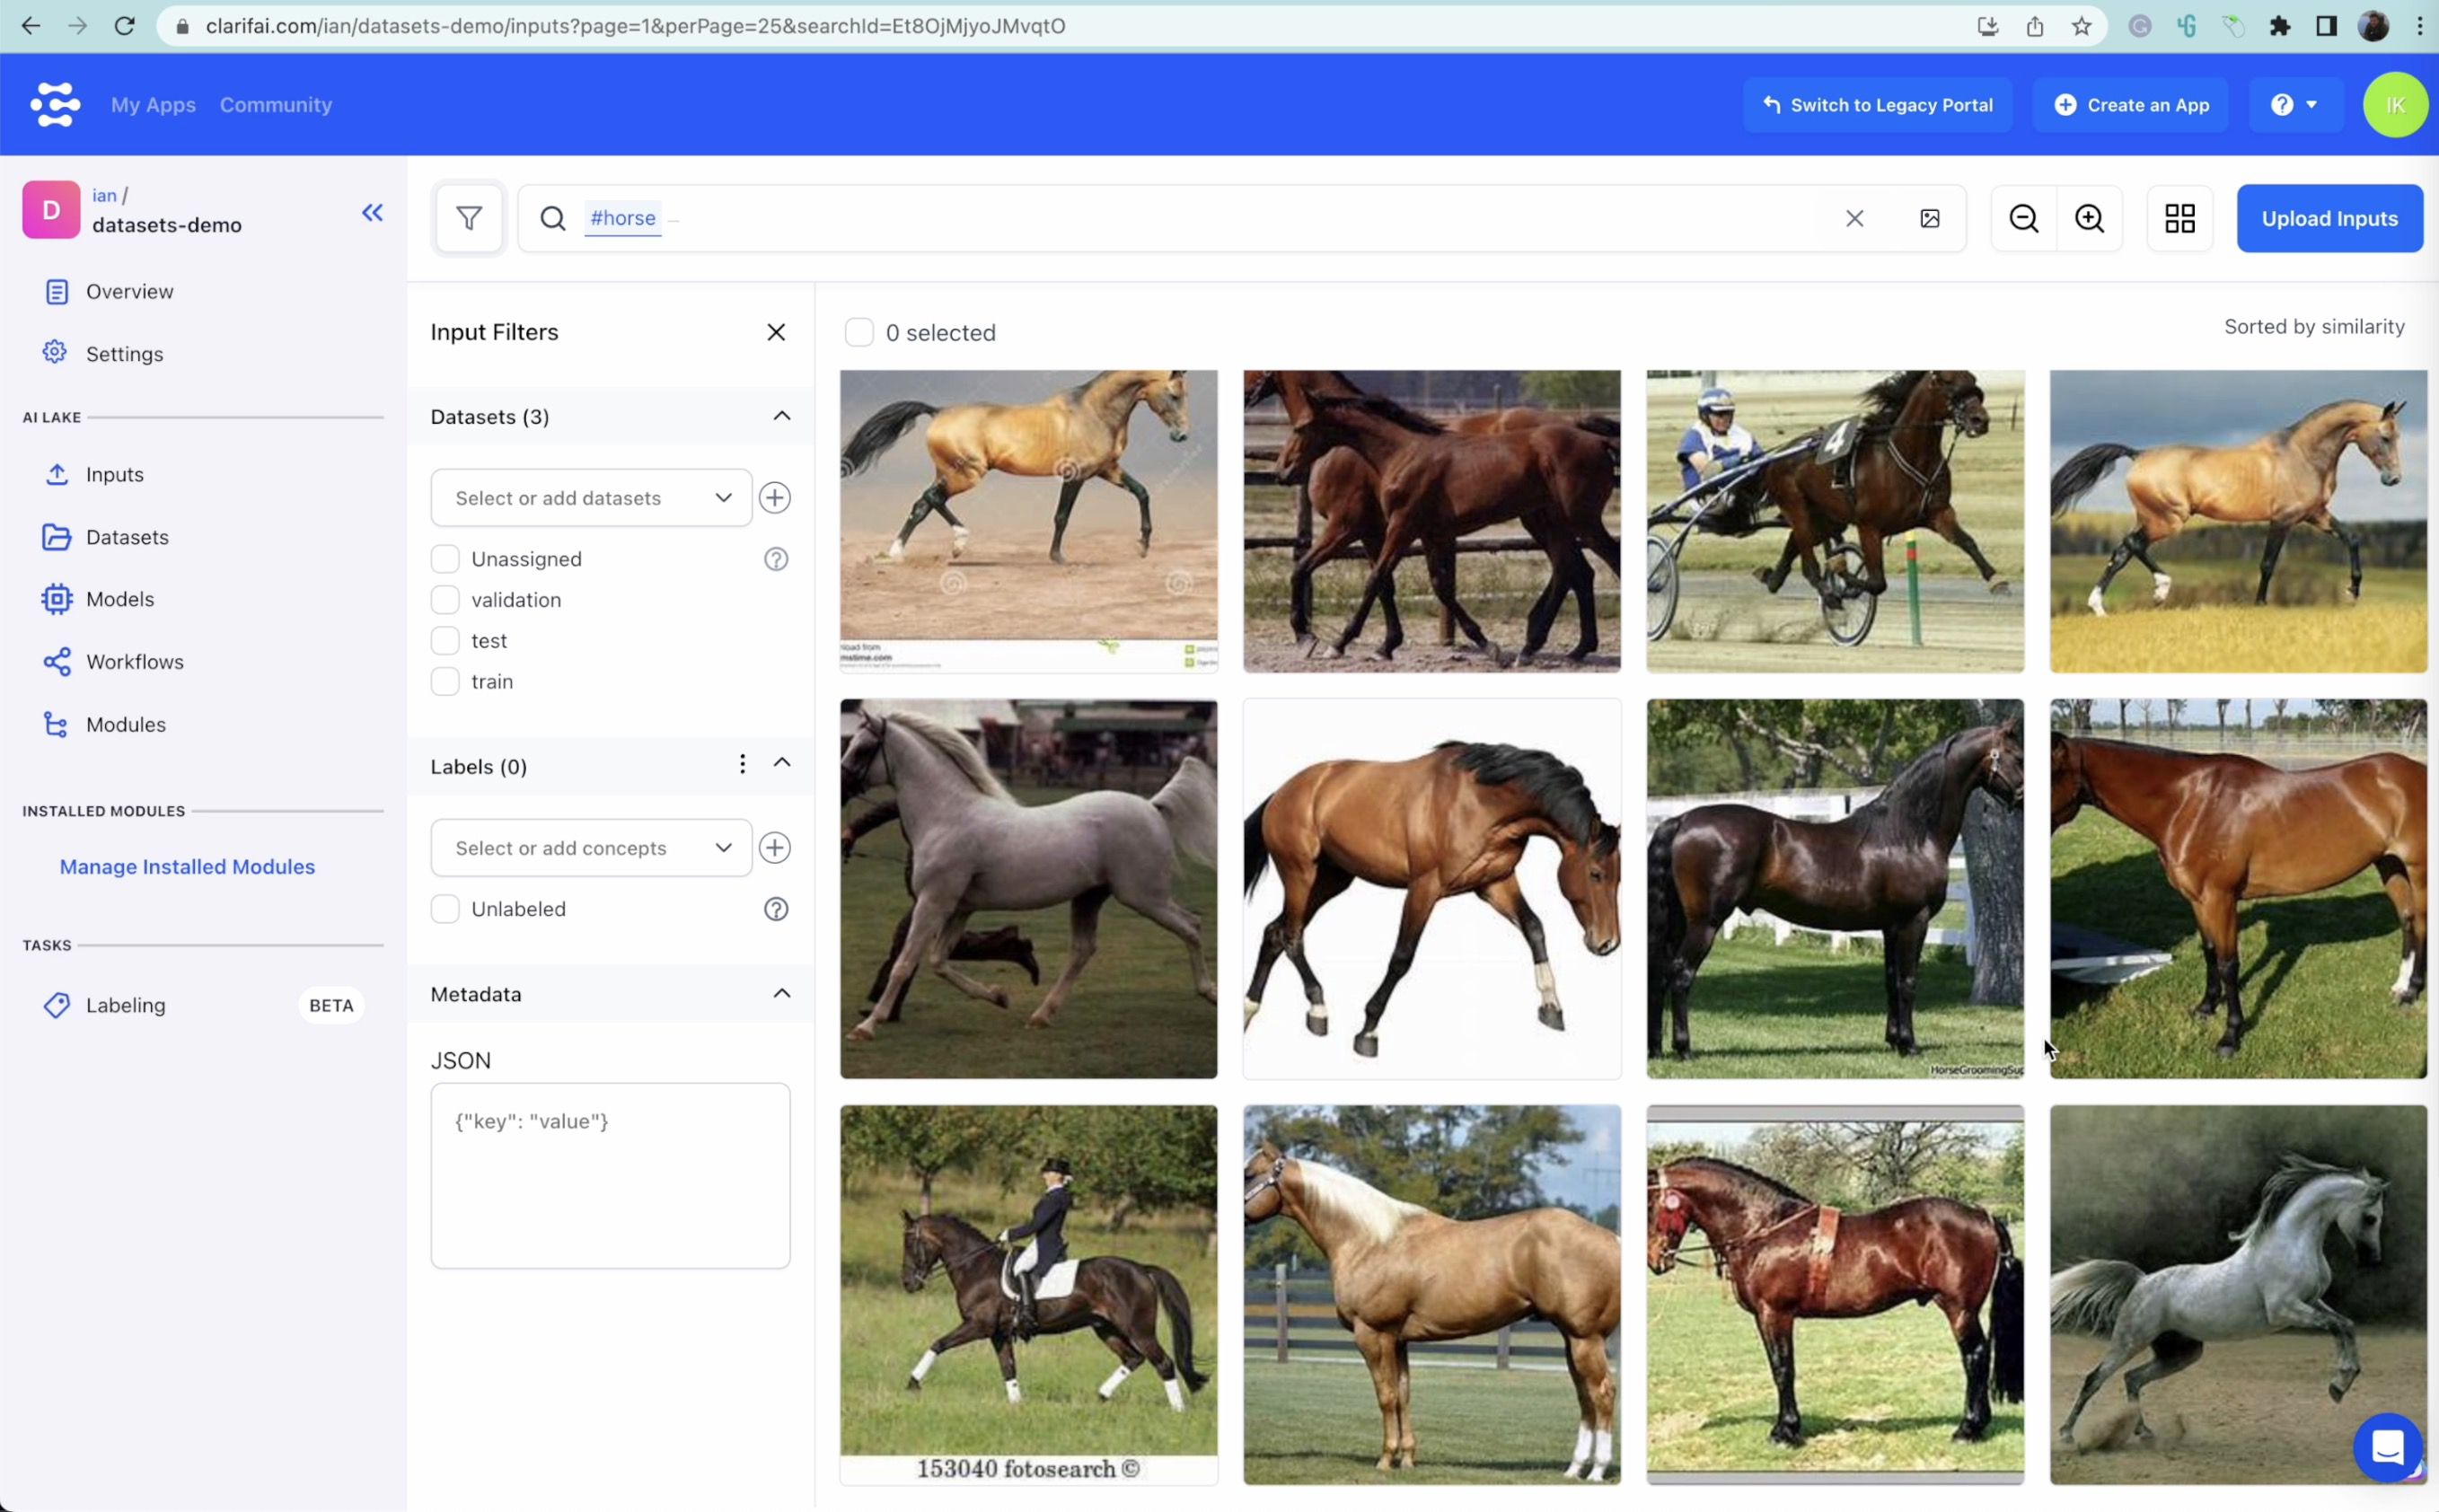
Results of a cross-modal search for the word "horse"
Repeat the labeling process for each animal category, including fixing any labeling errors or removing unnecessary images from the dataset. Once all images have been sorted and labeled, you will have a categorized dataset that is partitioned into training, validation, and test datasets, ready for modeling.
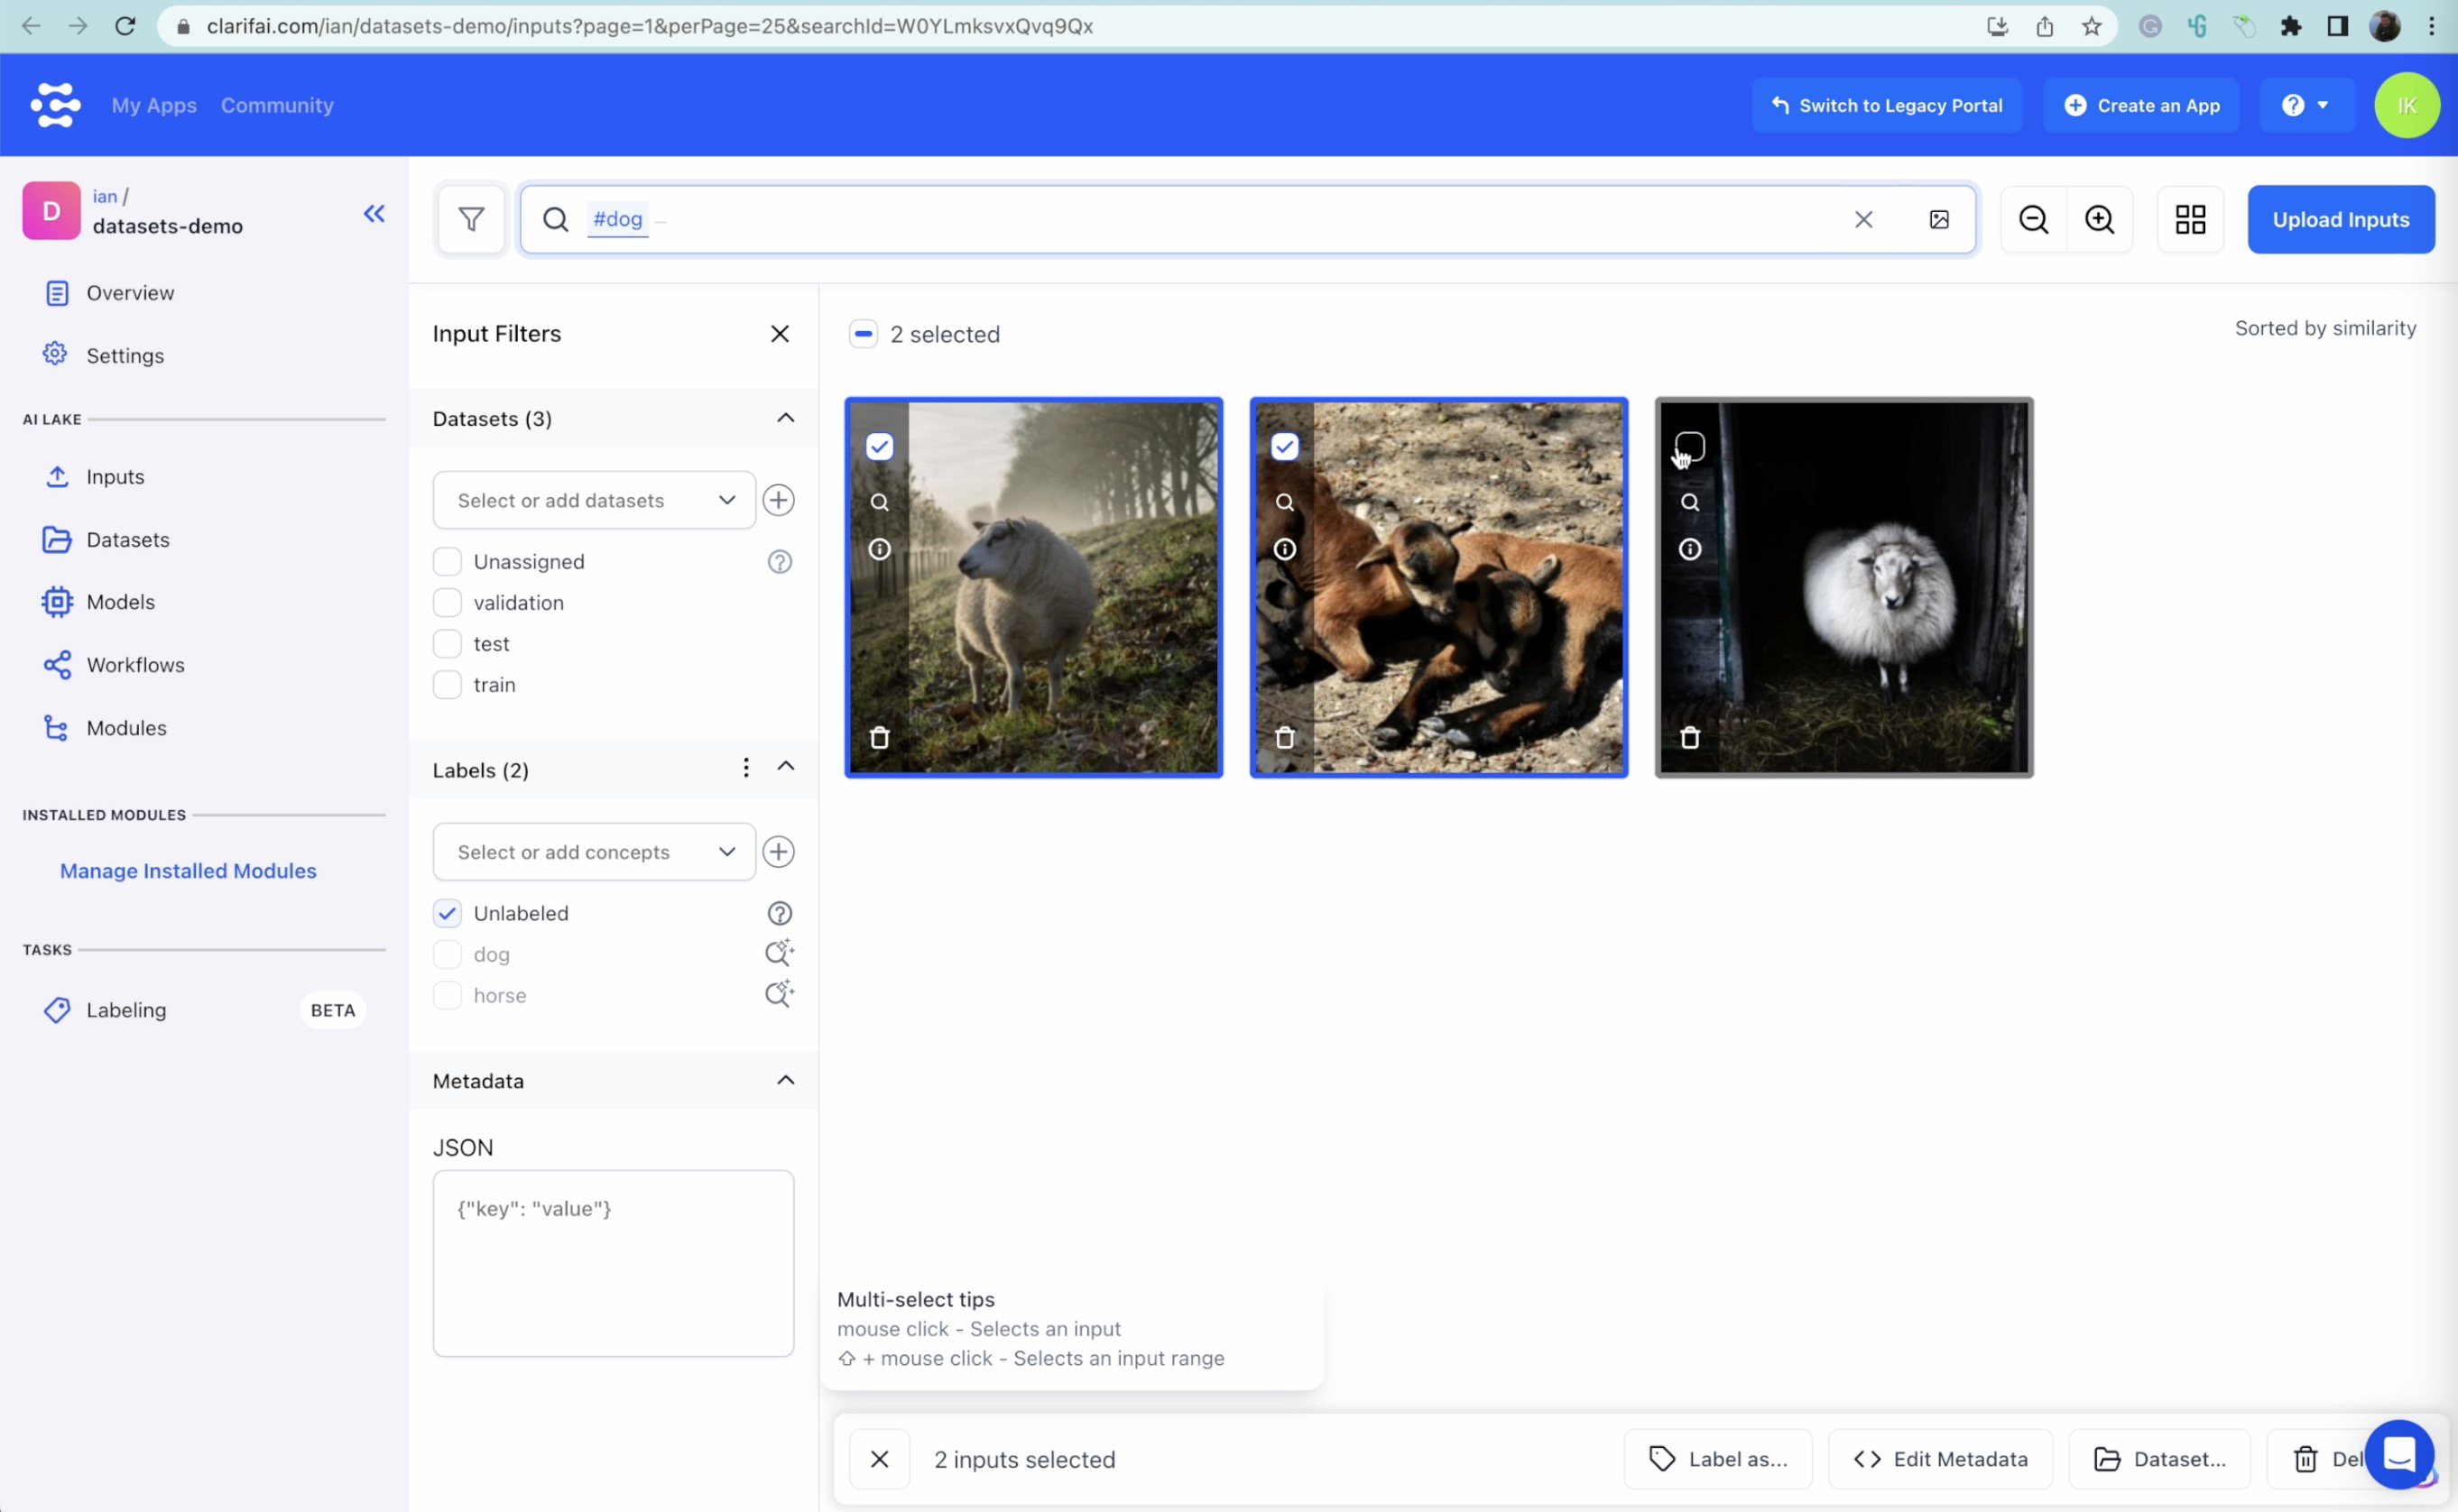
We can clearly see these are sheep accidentally detected as dogs by the visual search, so we can fix them manually.
For this tutorial, we will train three different models:
In this tutorial, transfer learning is implemented using a customized InceptionV2 architecture. InceptionV2 is a refined version of the classic Inception model, which primarily focuses on the scalability of deep learning architectures and efficient parameter usage. This model provides a strong foundation for transferring the knowledge of recognizing common objects and various concepts in images to our animal classification problem.
Transfer learning is a technique that leverages the knowledge gained from a pre-trained model to facilitate the learning process of a new model for a related problem. This approach speeds up the training process and often improves performance because the pre-trained model has already learned valuable features and patterns from large datasets, enabling the new model to start with a strong feature set.
In our case, when using Transfer learning, we take a model that was trained on a similar task (e.g., object recognition in images) and fine-tune it to recognize our specific classes of animals. The best part of transfer learning is that it happens in seconds, not minutes or hours.
ResNet 50, short for Residual Network with 50 layers, is a popular and widely used Deep Learning model for computer vision tasks. It is a type of Convolutional Neural Network (CNN) known for its residual connections, which help overcome the degradation problem in deep networks, enabling training of deeper models and improving accuracy.
ResNet 50 is capable of handling large-scale image classification tasks, but it generally requires more training time compared to transfer learning because it needs to learn the features and patterns from scratch. In our tutorial, we train a ResNet 50 model from scratch using our labeled dataset of animal images.
EfficientNet is another Deep Learning model designed specifically for computer vision tasks. It focuses on improving the efficiency of Convolutional Neural Networks by using a new scaling method called "compound scaling." This approach scales the width, depth, and resolution of the neural network simultaneously while optimizing for both performance and computational cost.
EfficientNet has multiple variants, with each version providing a trade-off between model size, speed, and performance. Like ResNet 50, when using EfficientNet in our tutorial, we train the model from scratch on our dataset of labeled animal images.
Each of the three models serves different purposes and can provide unique insights into the dataset. By training and comparing the performance of these models in our tutorial, we can ultimately select the most accurate and efficient model for our animal recognition task.
Evaluate each model's performance on the training dataset to see how well they have been trained. The evaluation metrics will help to determine each model's accuracy.
Evaluate the models on the validation dataset to determine their real-world performance. The performance on the validation dataset will help you choose the best-suited model for your use case.
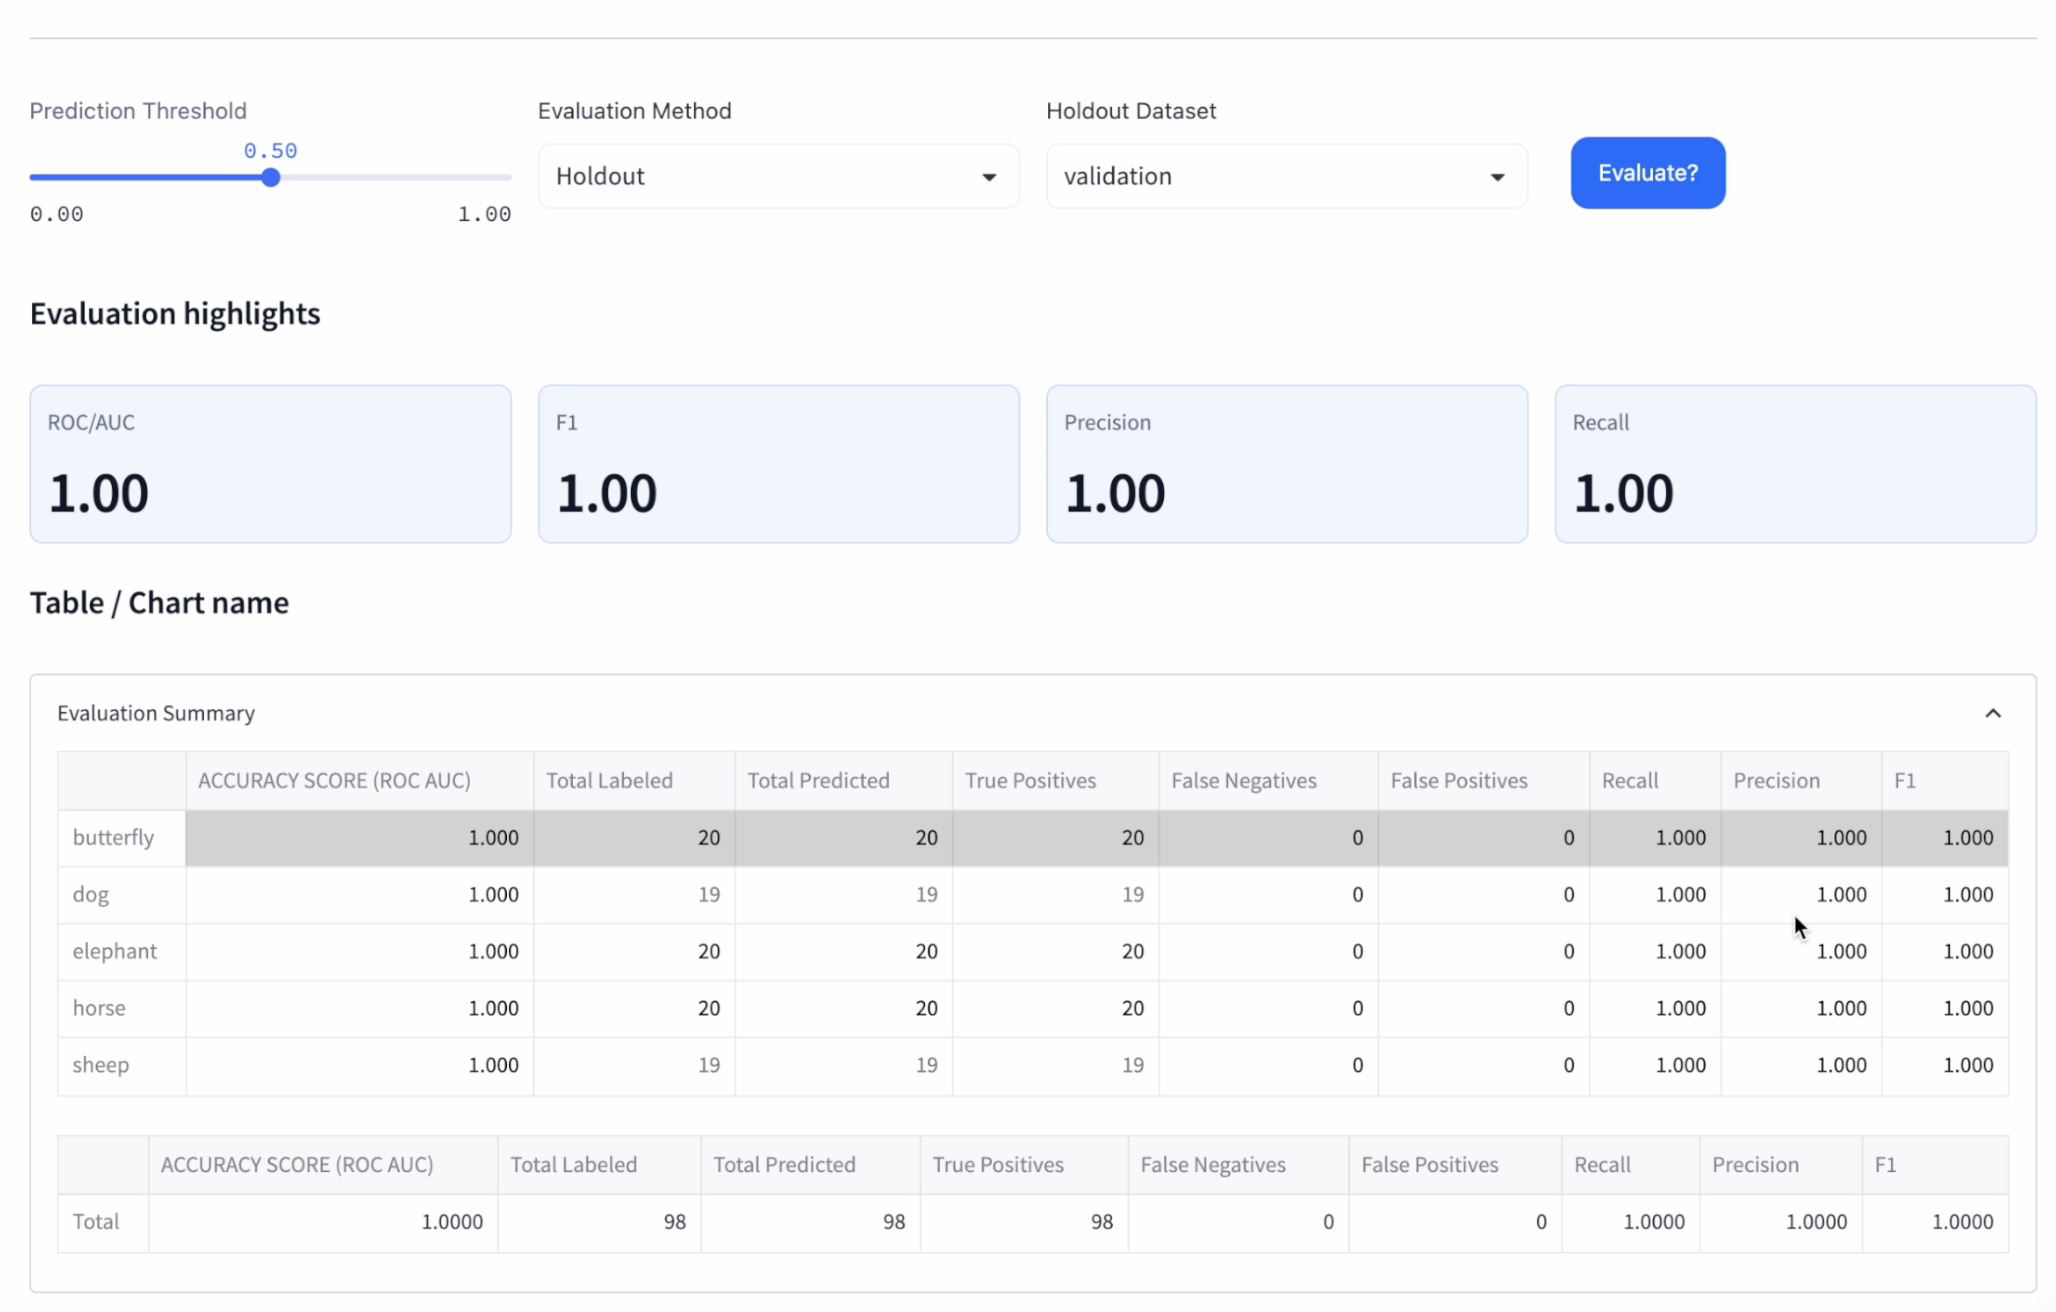
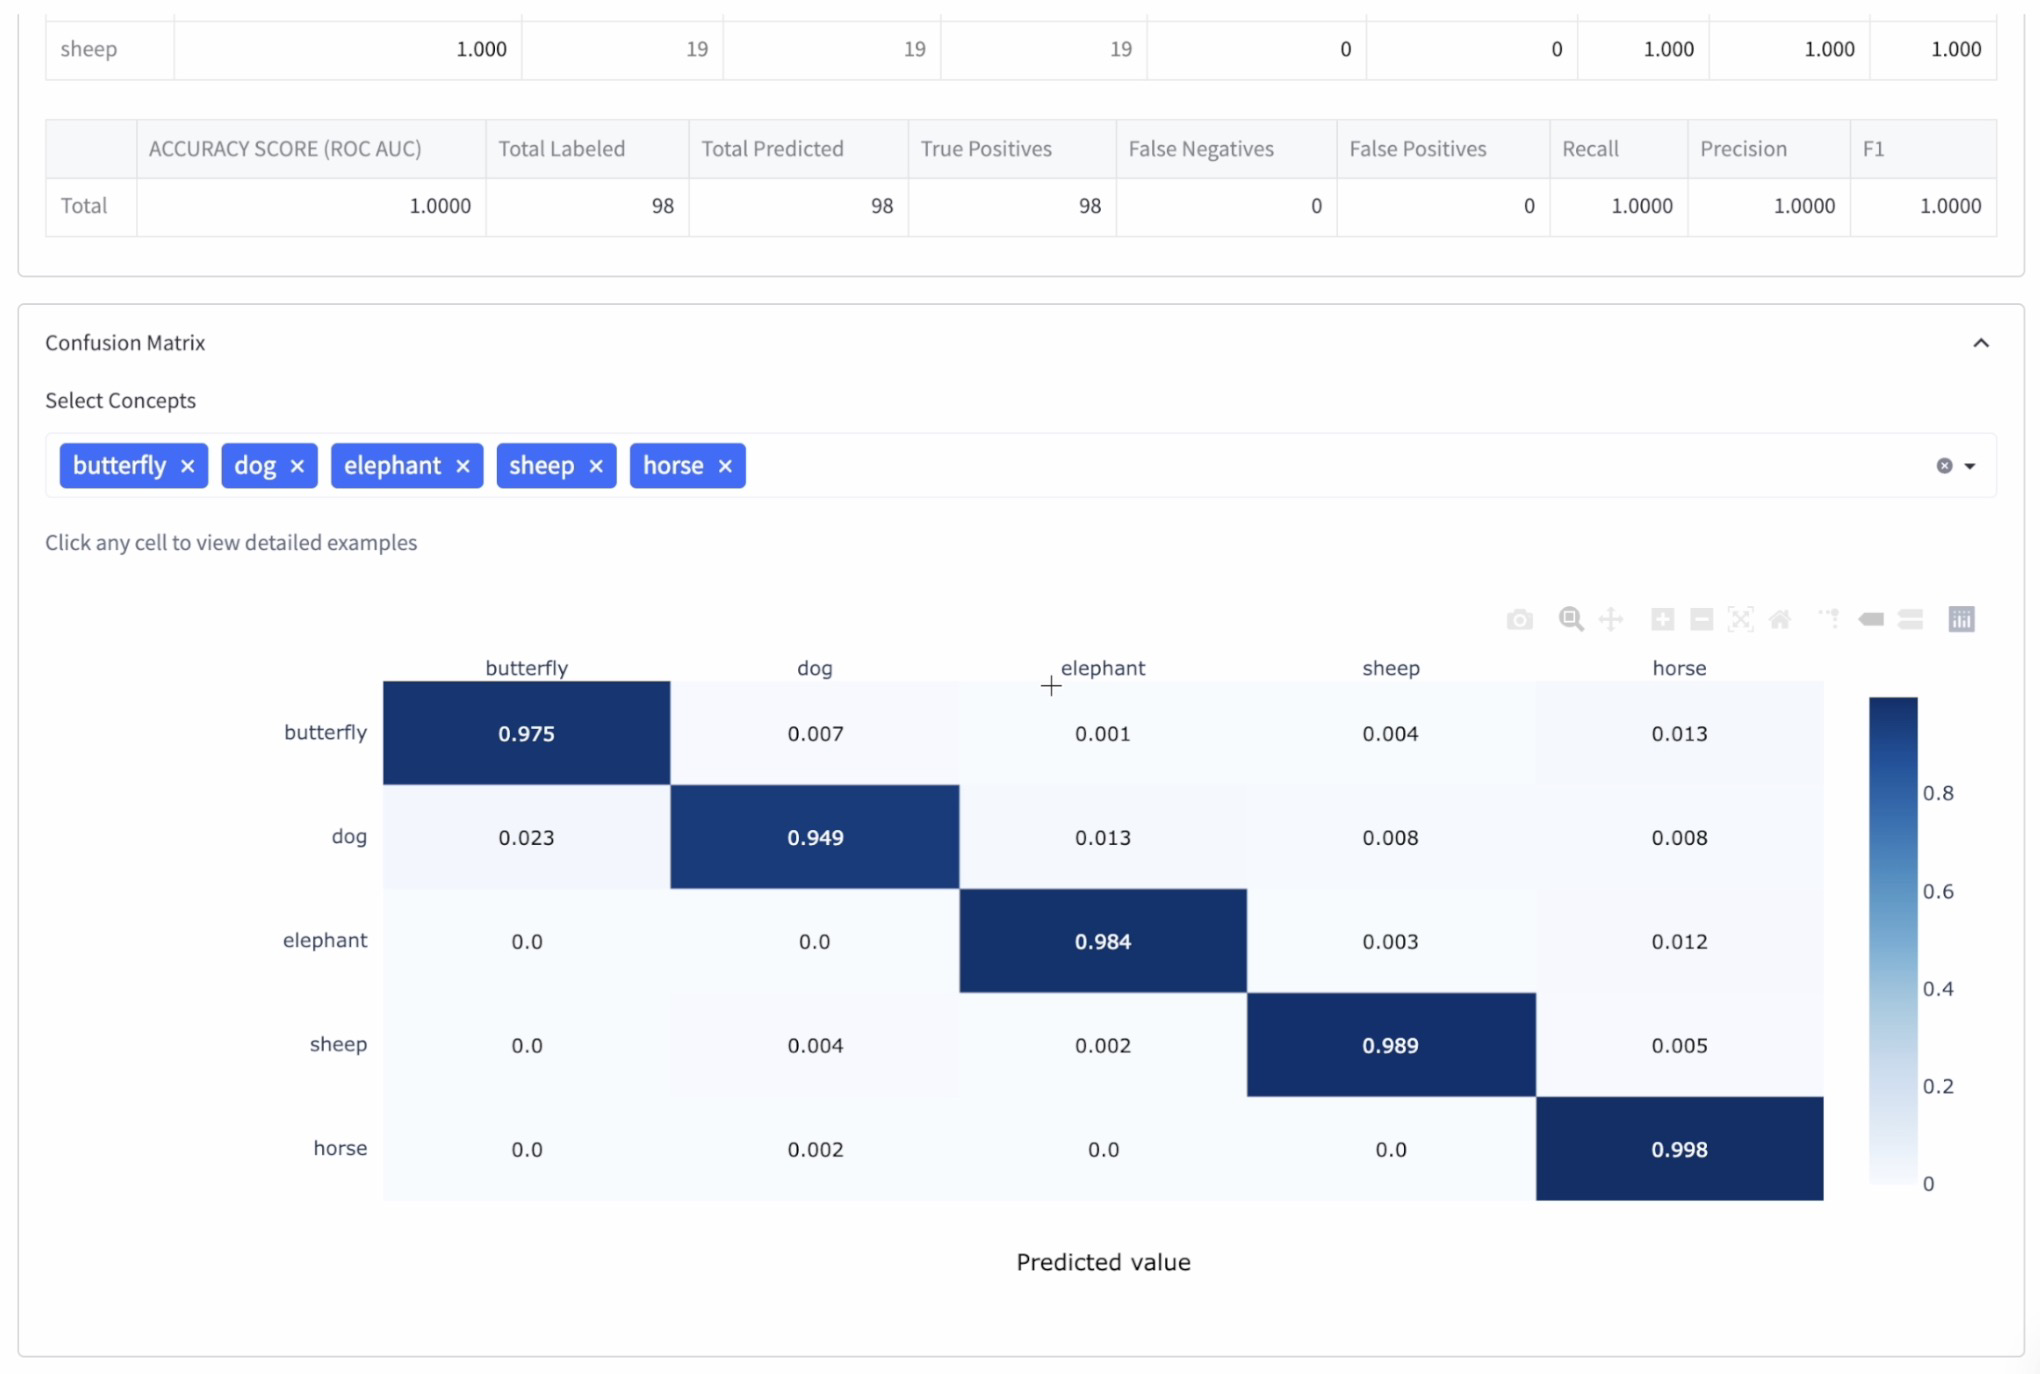
A confusion matrix is a widely used tool for visualizing and evaluating the performance of a classification model. It helps quantitatively define the successes and failures of the model and provides valuable insights into model behavior. By examining confusion matrices, we can assess the quality and confidence levels of each model related to their predictions and compare their performance.
In a confusion matrix, each row represents the actual class (ground truth), while each column represents the predicted class (model output). The diagonals of the matrix contain the correct predictions made by the model, whereas the off-diagonal cells contain the incorrect predictions. Here are a couple reasons to check out your models' confusion matrices:
1. Quantitative evaluation of model performance: The confusion matrix provides a detailed comparison of the model's predictions versus the actual labels of the dataset. It helps identify the number of correct and incorrect predictions for each class, as well as potential sources of error or confusion between classes.
2. Confidence levels: The numbers in the matrix's diagonal cells represent the model's correct predictions. By comparing these values with the total number of predictions for each class, we can gauge the model's confidence levels. Ideally, we want the values in the diagonal to be as close to one as possible and the other cells to be as close to zero as possible, indicating high confidence in the model's predictions.
3. Identification of model weaknesses: We can identify patterns of misclassification, which highlights areas where the model might be struggling or requires improvement. For instance, suppose the model consistently confuses two classes, resulting in high off-diagonal values. In that case, we may need to address the issue by fine-tuning the model, augmenting the training data, or choosing a different architecture suitable for the problem at hand.
4. Model comparison: When comparing multiple models, we can determine which model has the best performance and highest confidence levels and select it for our specific task.
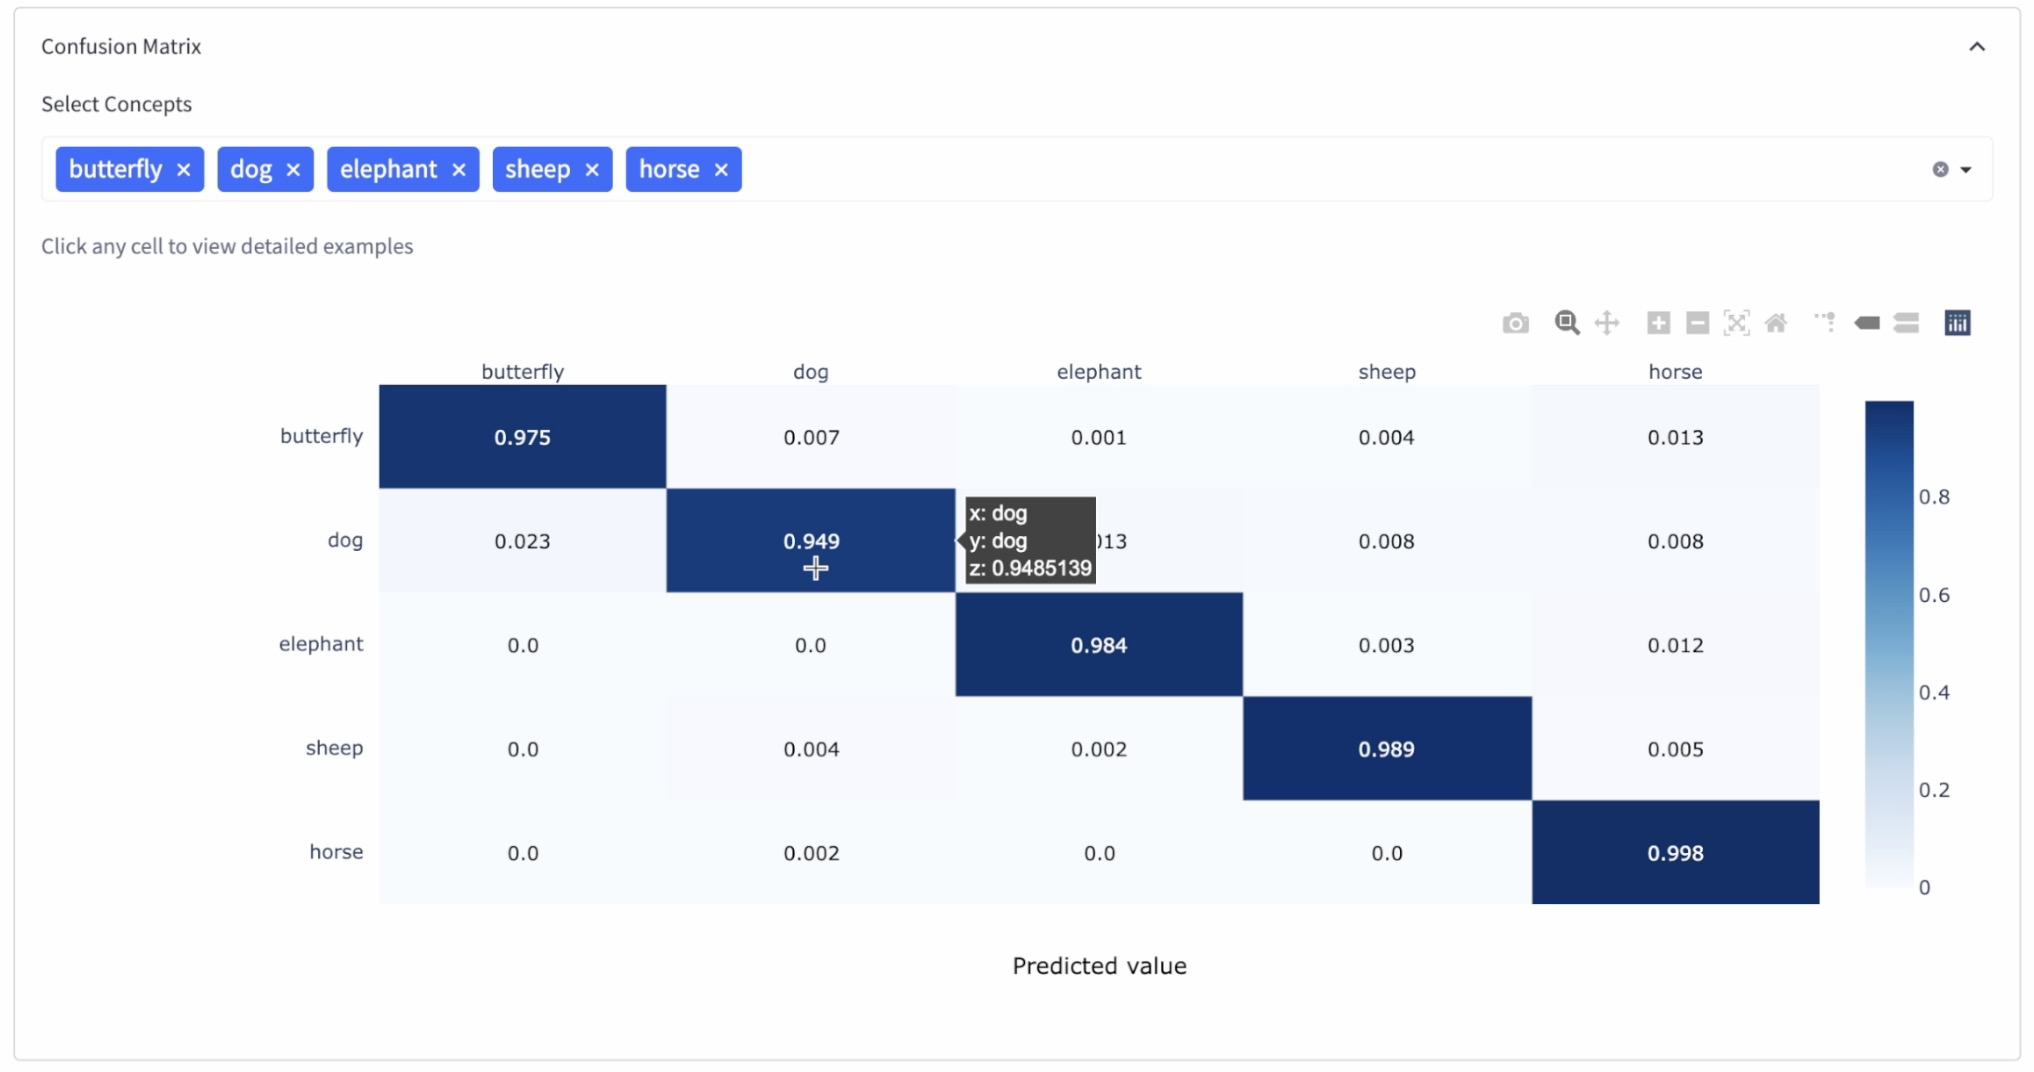
Based on their performance on the validation dataset and the confusion matrix, choose the model with the highest accuracy and confidence levels. In our case, the Transfer Learn model proved to be the best.
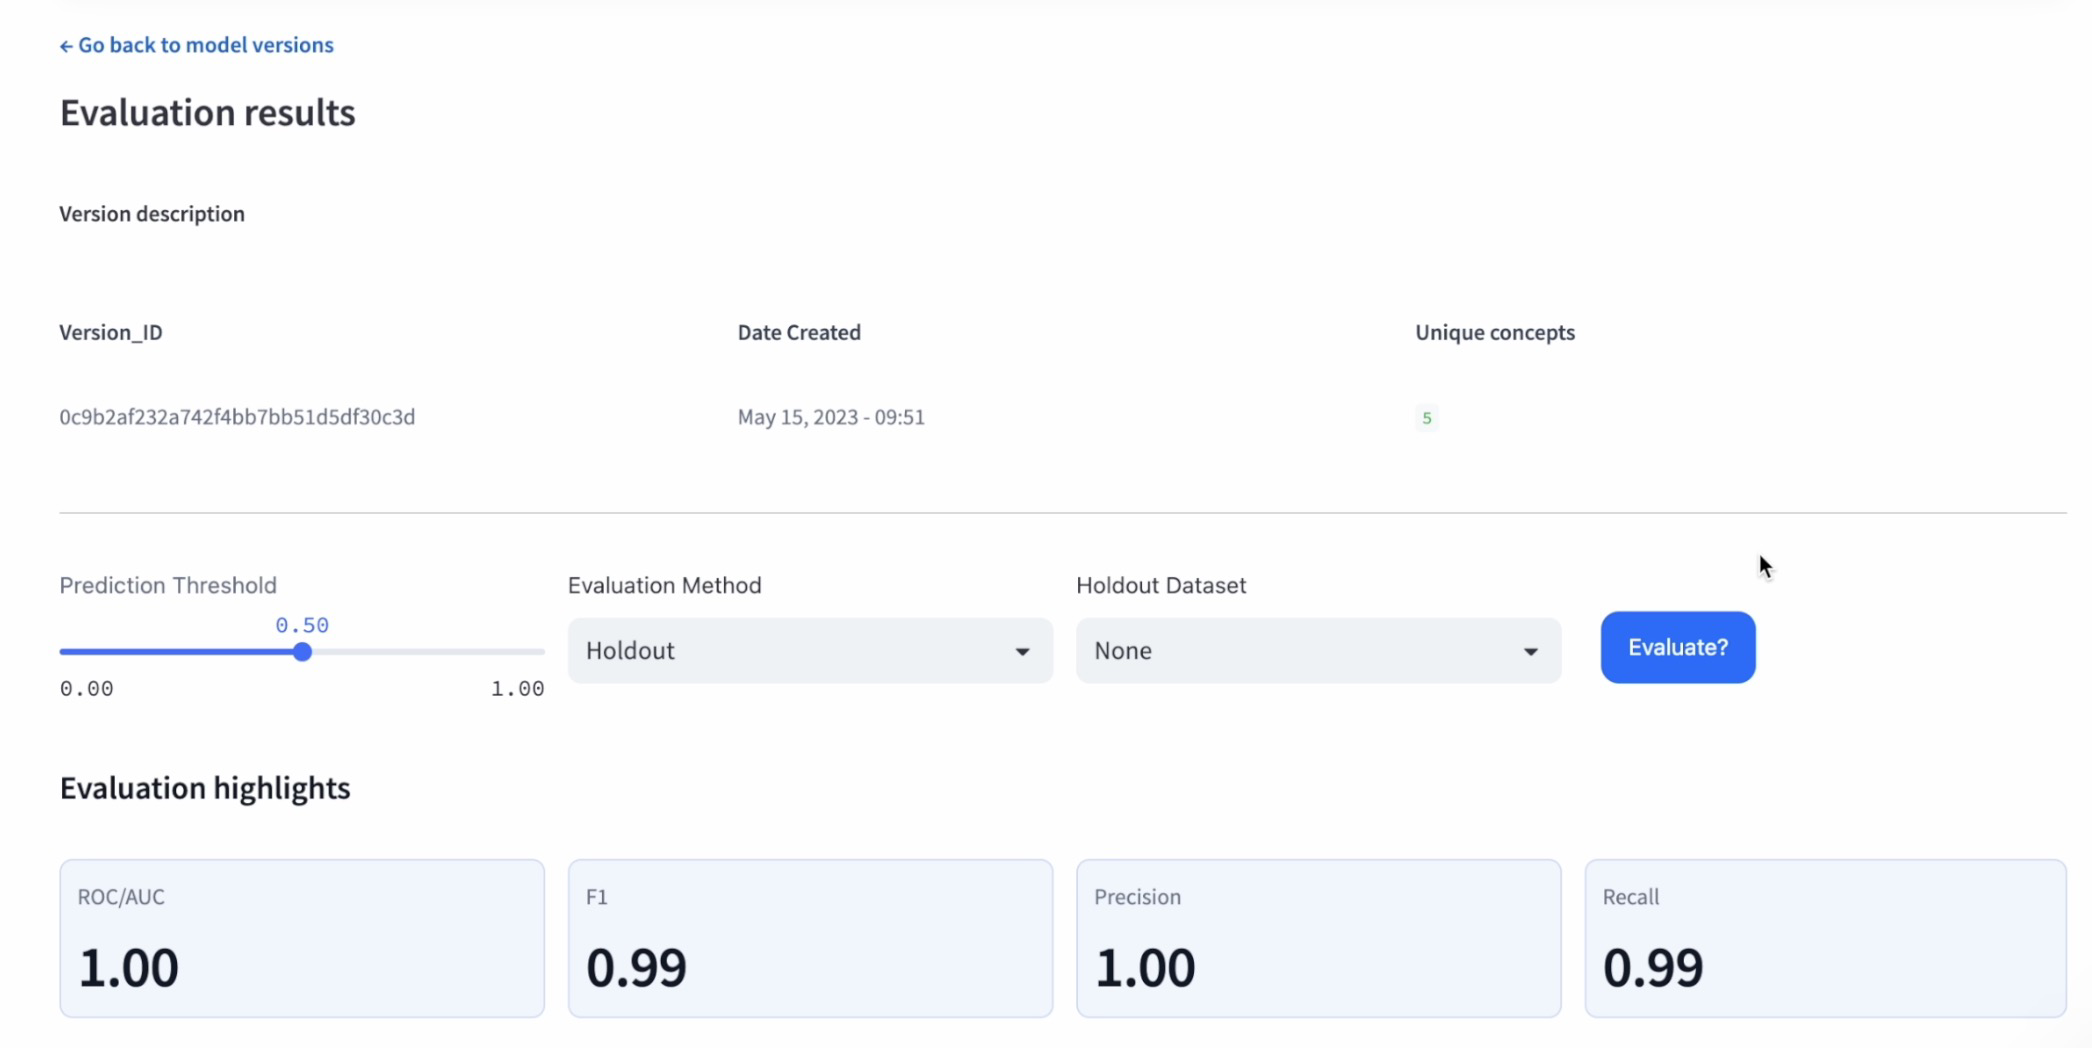
Once you have selected the best model, perform a final evaluation on the test dataset to get a sense of its real-world performance. This evaluation will give you an idea of how well the model will perform in practical use.
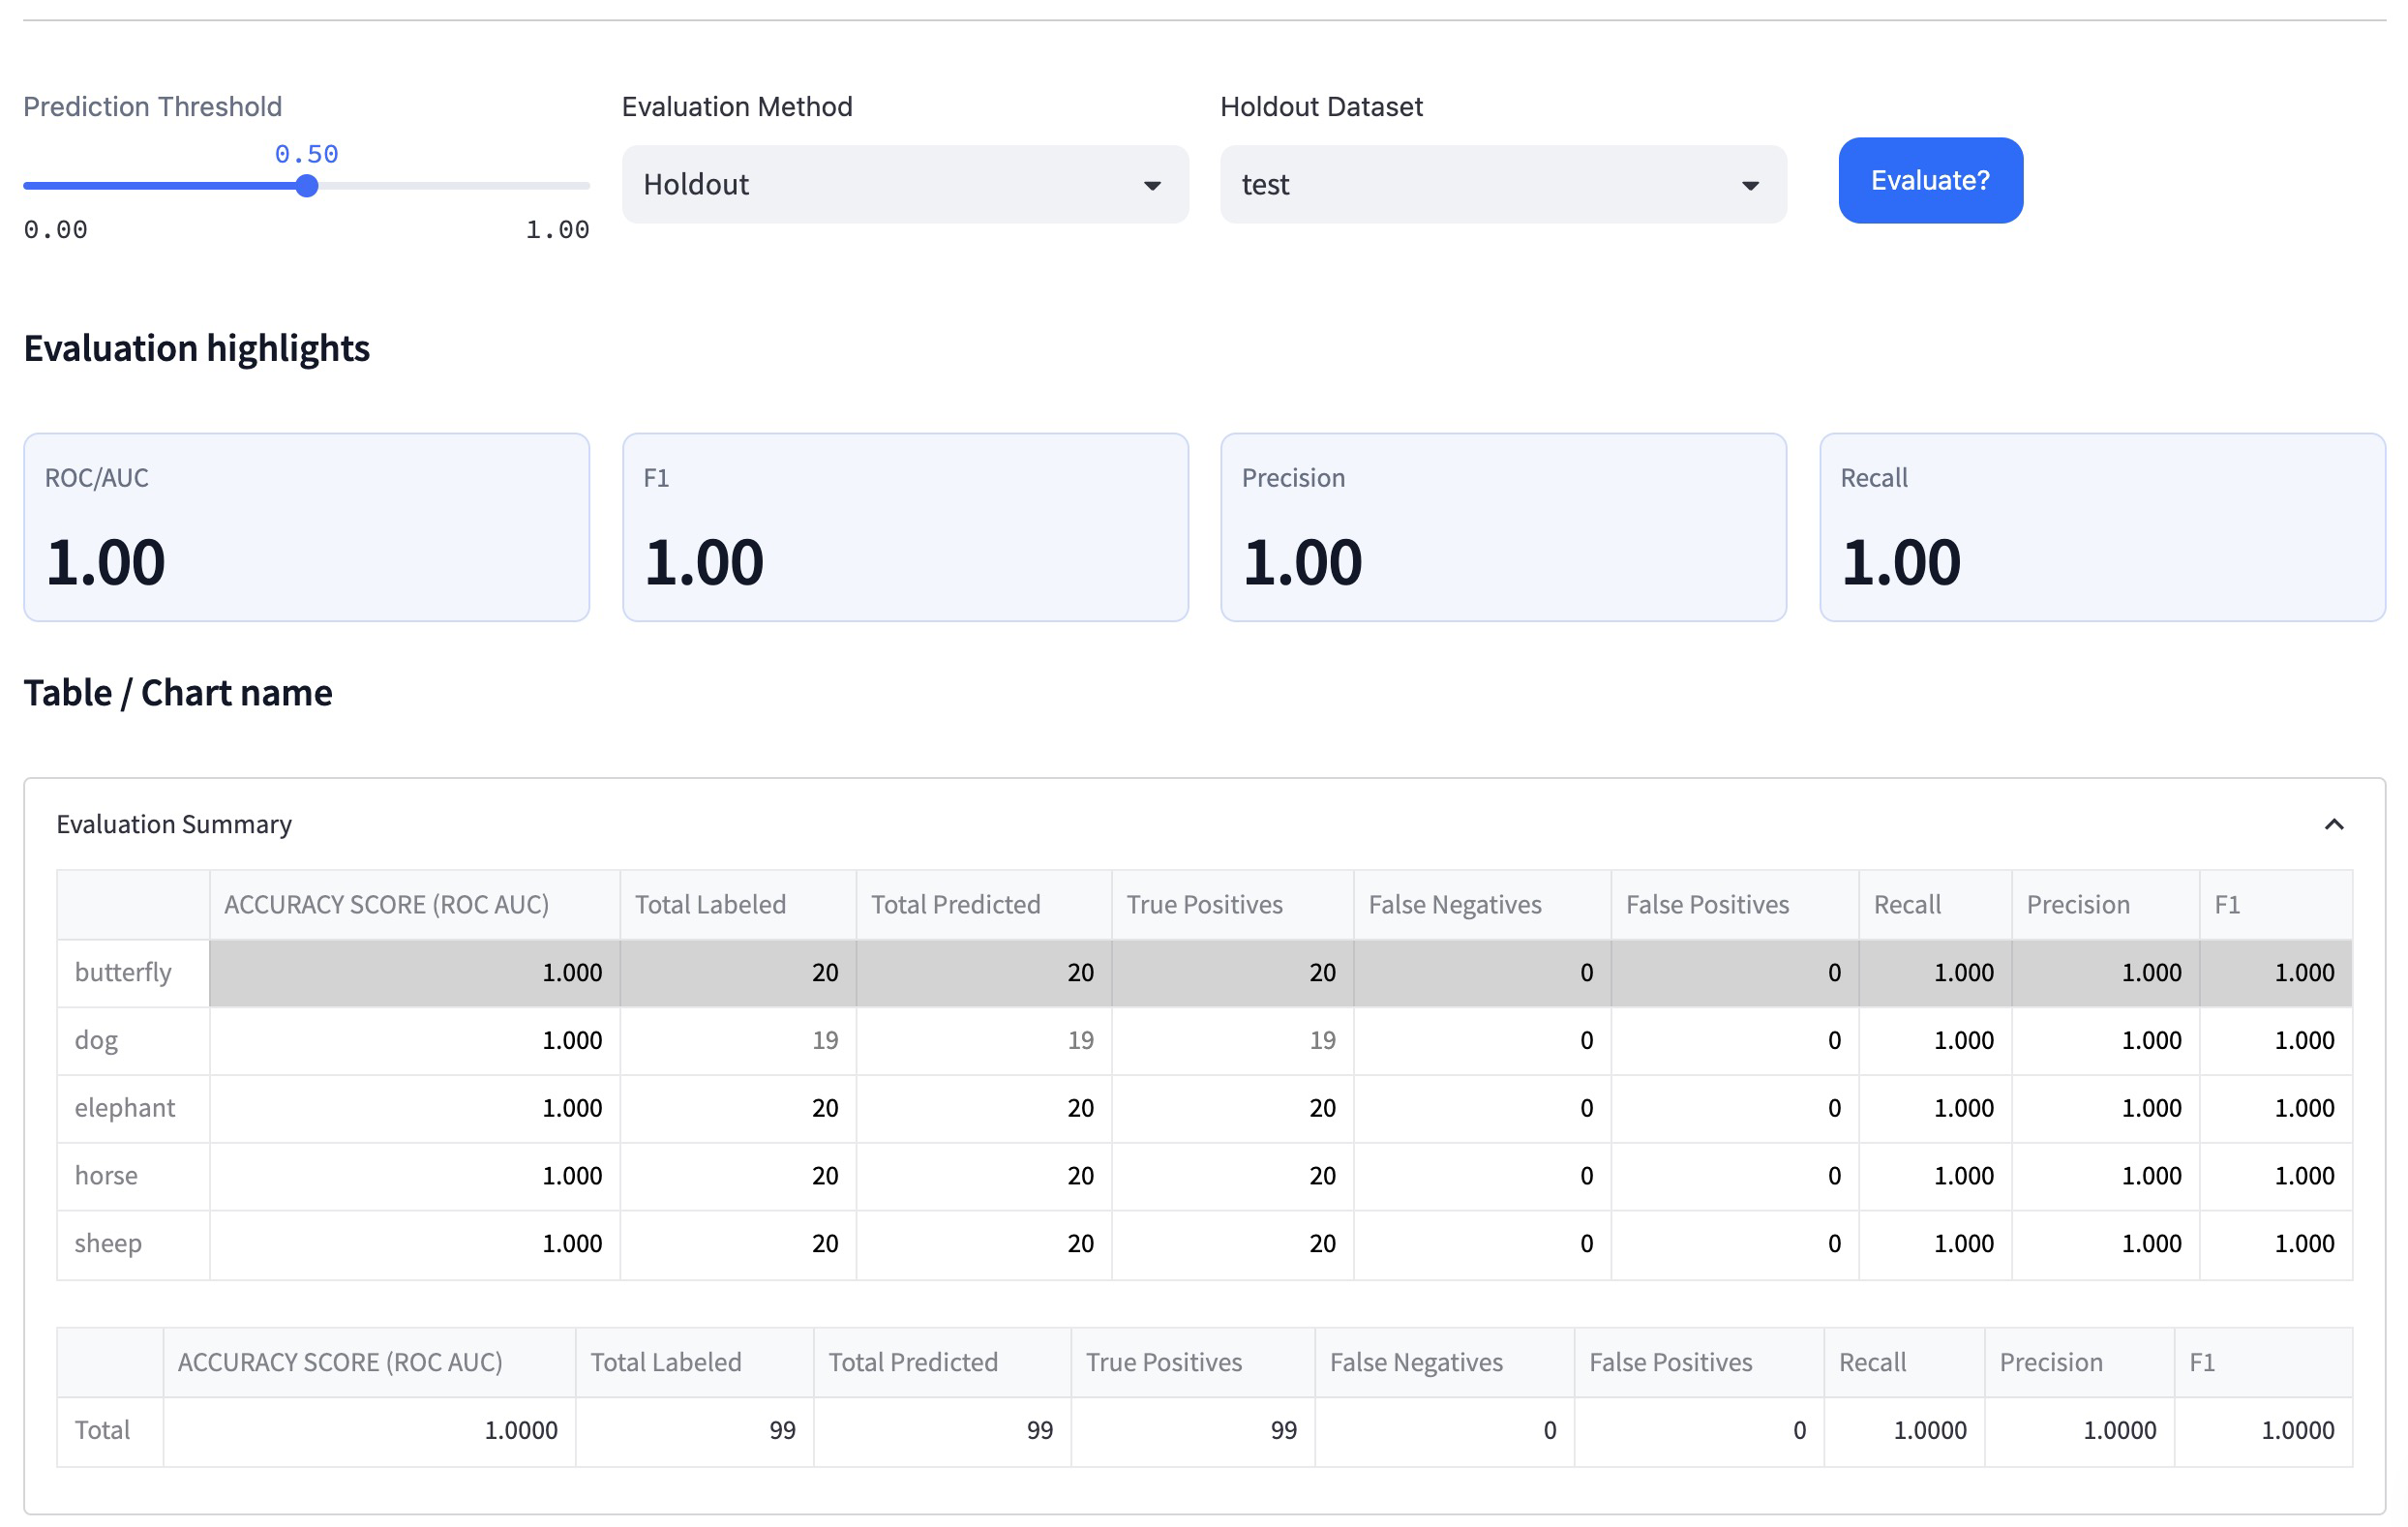
Examine the performance metrics, accuracy, and confusion matrix of the best-performing model on the test dataset. In our case, the Transfer Learn model achieved 100% accuracy and high confidence levels on the test dataset.
By following this tutorial, you should now have successfully trained multiple models using a dataset of animal images, bulk-labeled the images, and used the evaluation module to compare the models and select the one with the highest test performance.
Remember that each use case may work better with different models, so it is always a good idea to test various models and compare their performance as demonstrated in this tutorial. This process will help ensure that you are using the most accurate and efficient model for your specific needs.
That'a a wrap!
If you're looking to scale and deploy custom models, open-source models, or third-party models, Clarifai’s Compute Orchestration lets you deploy AI workloads on your dedicated cloud compute or within your own VPCs, on-premise, hybrid, or edge environments from a unified control plane. It offers flexibility without vendor lock-in. Check out Compute Orchestration.